 SciPocket
GYM BATTLE · NORMAL / MOVE LEVELS
How much does Arc Suit Gladion gain at 3/5 and 5/5? Damage and candy value over 270 seconds
We varied only Arc Suit Gladion & Silvally’s move level from 1/5 to 5/5, comparing 270-second Normal physical damage alongside Juliana (Anniversary 2026) & Terapagos and Larry (Special Costume 2) & Komala.
Open this team and recalculate at your own move level. Try the selected team in the calculator →
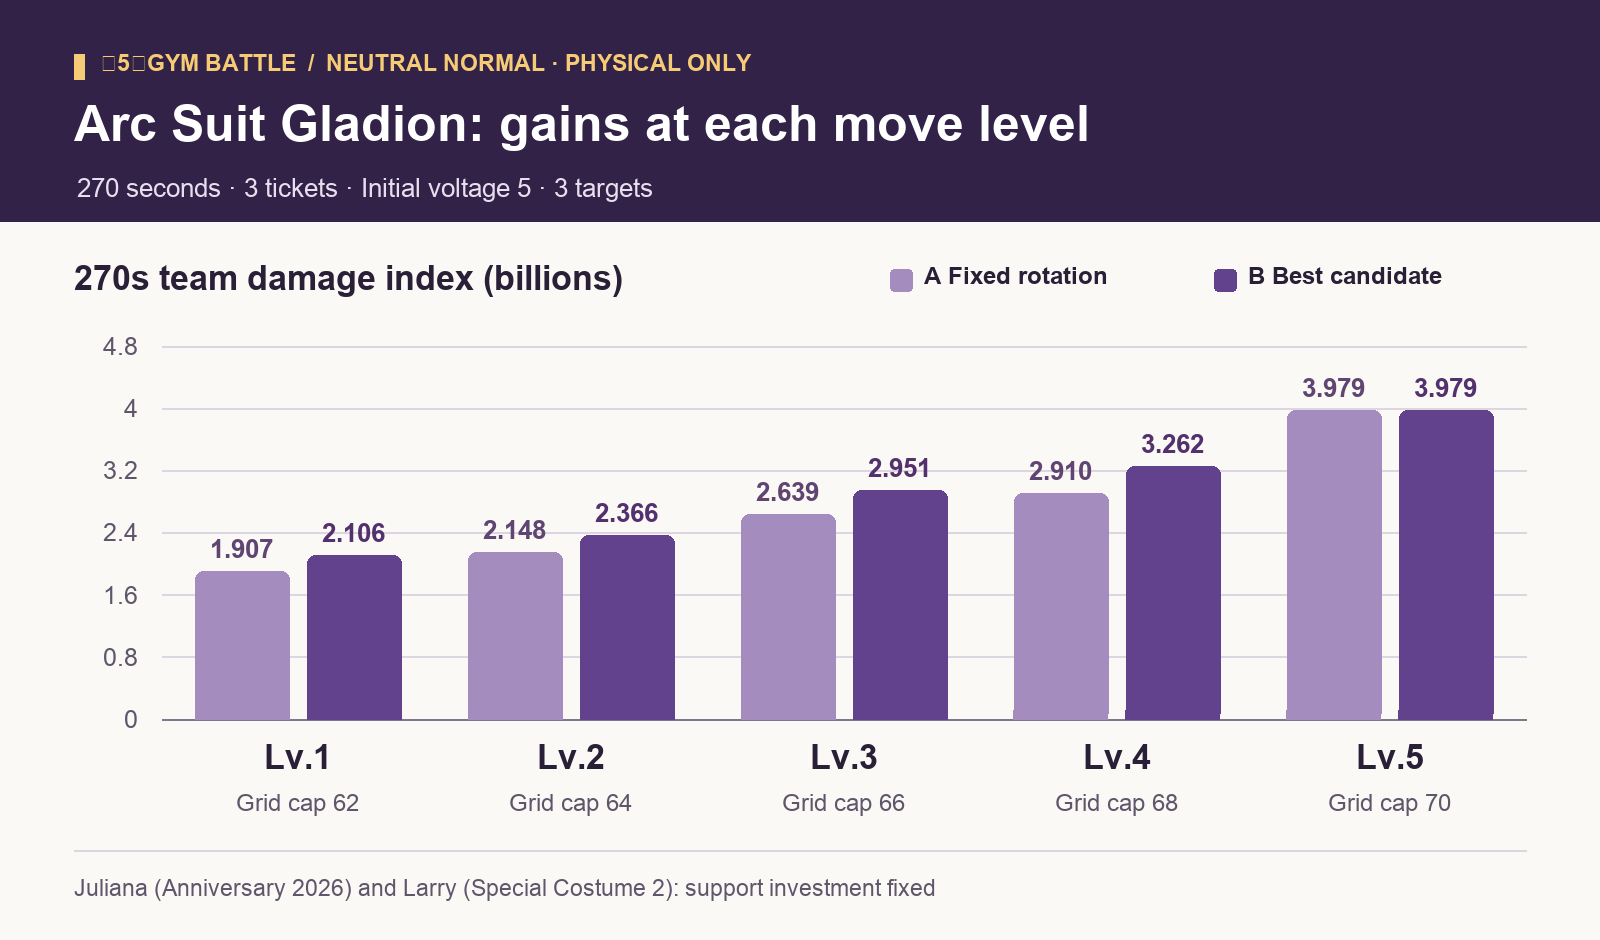
Among candidates with adjusted rotations, damage rose from2.106 billionat move level 1 to2.951 billionat level 3 and3.979 billionat 5/5. The 2/5→3/5 gain was+0.586 billion (+24.75%), and 4/5→5/5 added+0.717 billion (+21.99%). Of the candidates compared, 4/5→5/5 gave the largest absolute team-damage increase per candy.
However, if you already clear the top floor of the Normal Tower at 1/5,extra move levels are a low priority for clearing it. Considering both Gym Battle use and damage growth from 1/5,we would prioritize Arc Suit Hau when investing candies from 1/5 in either pair. Below, we explain why, with references to our earlier Gym Battle articles.
Conditions and reproduction of the published result
We used three tickets, 270 seconds, initial voltage 5, and three opponents taking neutral Normal damage. Only physical attacks score. Both supports remain at move level 5 with the investment and grids from the published article; Gladion’s 6★ EX and EX Role are also fixed. None of the three receives a Superawakening bonus in these recorded conditions. Juliana’s and Larry’s special moves, special sync moves, and Tera moves contribute no damage, soteam damage equals Gladion’s personal totalat every move level.
The grid-energy caps are 62 / 64 / 66 / 68 / 70. Required move levels, connected paths, and energy costs are restricted using the existing data. Base power also changes: Almighty Multi-Attack is 200/210/220/230/240, Almighty Crush Claw is 450/472/495/517/540, and the sync move is 350/367/385/402/420. Grid power bonuses are added afterward.
Replaying the published 5/5 grid and saved rotation reproduced3,978,936,717 (3.978936717 billion)exactly. The first-sync ×2 effect follows the existing model: it adds 100 percentage points to other sync-move power boosts on Gladion’s first personal sync. Published baseline
Comparing move levels 1–5
Parentheses in the move-level column show grid energy used/cap. Sync counts are personal/team. Team and personal damage, and their growth rates, are identical here. Percentage gains use the unrounded indices. Damage values below are in billions.
A. Fixed rotation
We rebuilt the grid at each move level while retaining the published rotation. This method changes only actions that become unavailable at lower levels, but all selected builds could replay the same 42 regular-action slots and four sync moves. Gladion syncs twice, at 161.50 and 237.50 seconds.
| Move Lv. | Team index | Gladion’s index | vs. level 1 | vs. previous level | Sync moves used | Main grid gains |
|---|---|---|---|---|---|---|
| 1/5(37/62) | 1.907 billion | 1.907 billion | +0.00% | — | 2/4 | Attack and buddy-move power tiles |
| 2/5(51/64) | 2.148 billion | 2.148 billion | +12.65% | +12.65% | 2/4 | Attack +20, two Attack +10 tiles, higher buddy-move base power |
| Lv. 3 (66 / 66) | 2.639 billion | 2.639 billion | +38.36% | +22.82% | 2/4 | First-sync and Attack-dependent move/sync boosts; sync power +75 |
| Lv. 4 (68 / 68) | 2.91 billion | 2.91 billion | +52.59% | +10.28% | 2/4 | Restore one Alola Passion MP the first time it reaches zero |
| Lv. 5 (70 / 70) | 3.979 billion | 3.979 billion | +108.64% | +36.74% | 2/4 | Zone/Circle Extension 3; combined sync-power tiles +100 |
B. Limited search
We reused four saved rotations, including the published one, and four to seven grid candidates per move level. Starting from the first 18 actions of a leading candidate, we ran the existing rotation search once per level at width 2. The table shows the highest team damage found within those candidates.
| Move Lv. | Team index | Gladion’s index | vs. level 1 | vs. previous level | Sync moves used | Main grid gains |
|---|---|---|---|---|---|---|
| 1/5(37/62) | 2.106 billion | 2.106 billion | +0.00% | — | 3/4 | Attack and buddy-move power tiles |
| 2/5(51/64) | 2.366 billion | 2.366 billion | +12.35% | +12.35% | 3/4 | Attack +20, two Attack +10 tiles, higher buddy-move base power |
| Lv. 3 (66 / 66) | 2.951 billion | 2.951 billion | +40.16% | +24.75% | 2/4 | First-sync and Attack-dependent move/sync boosts; sync power +75 |
| Lv. 4 (68 / 68) | 3.262 billion | 3.262 billion | +54.90% | +10.52% | 2/4 | Restore one Alola Passion MP the first time it reaches zero |
| Lv. 5 (70 / 70) | 3.979 billion | 3.979 billion | +88.96% | +21.99% | 2/4 | Zone/Circle Extension 3; combined sync-power tiles +100 |
2/5→3/5 mainly strengthens the sync move
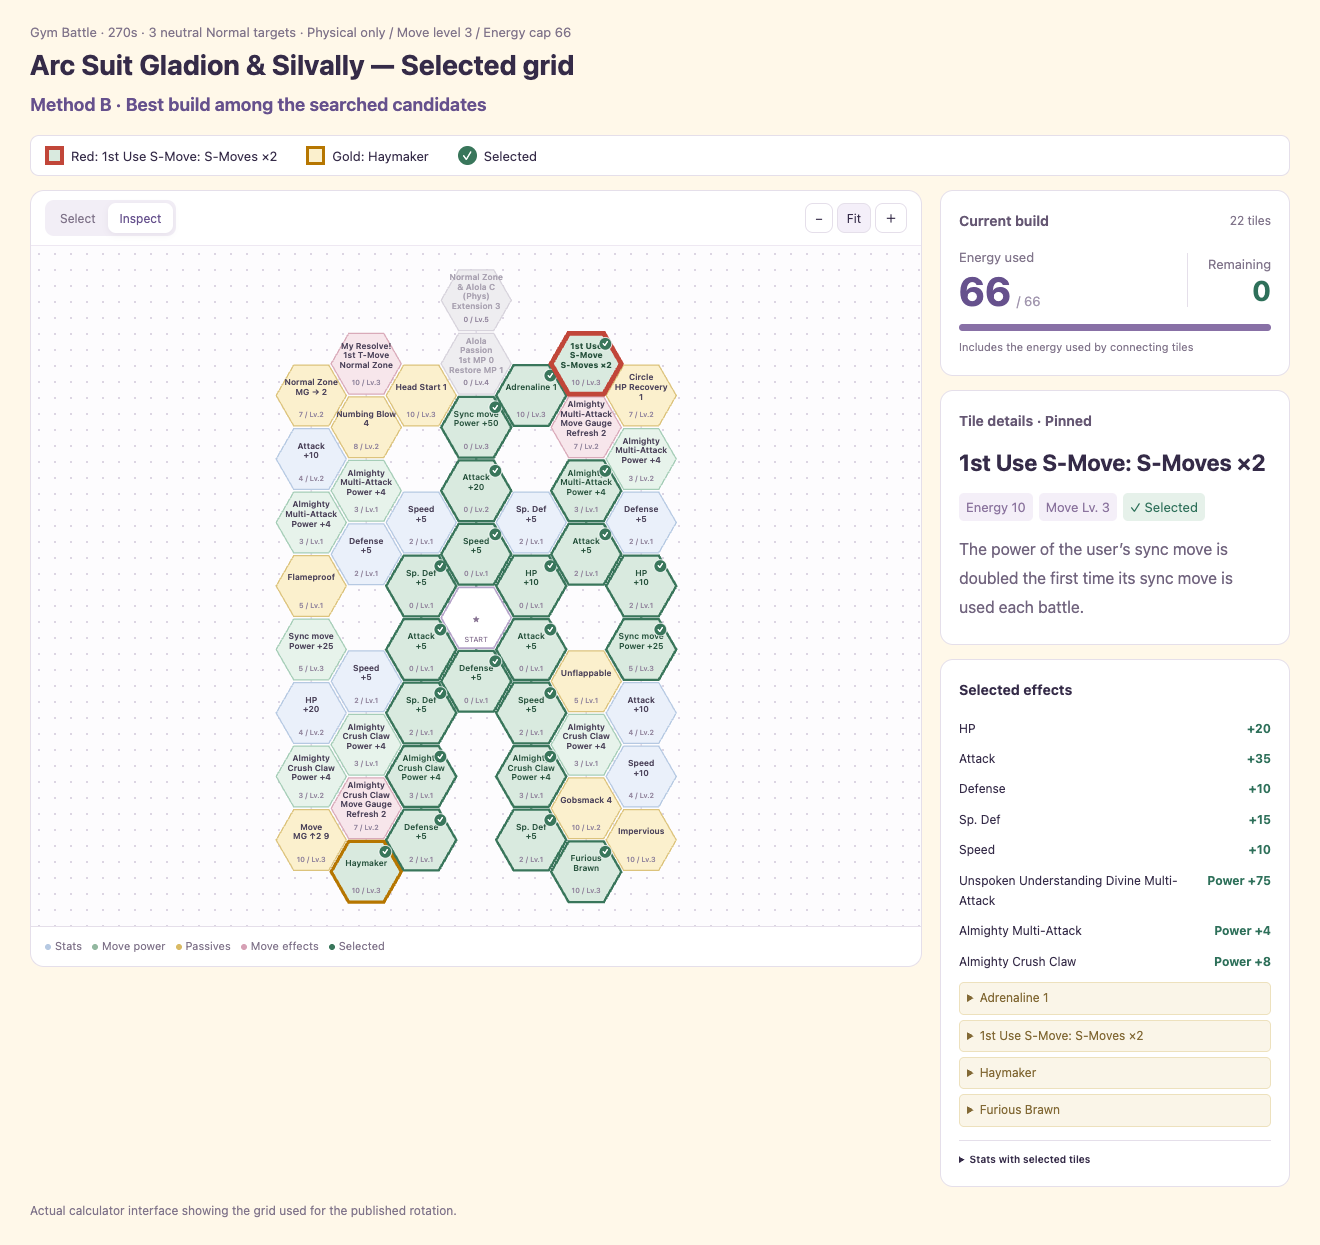
At 3/5,“1st Use S-Move: S-Moves ×2,” Haymaker, and Furious Brawnbecome available. The selected grid combines these three tiles with Adrenaline 1 and sync power +50 and +25. Gladion enters with Attack raised by six ranks, enabling the Attack-dependent bonuses.
In method B, personal sync damage rises from0.385 to 0.952 billionat 2/5→3/5, while regular and buddy moves rise from 1.981 to 1.999 billion. Gladion uses two sync moves instead of three, but each is stronger. The rotation uses support syncs first, followed by Gladion at 128.25 and 232.75 seconds at 3/5. Together, the grid and rotation changes add+0.586 billion.
Head Start 1 and “My Resolve!: 1st T-Move: Normal Zone” also unlock at 3/5. The best candidate here spends that energy on the damage tiles above instead.
From MP recovery at 4/5 to duration extension at 5/5
At 4/5, the zero-energy tile “Alola Passion: 1st MP 0: Restore MP 1” unlocks. Spending a remaining use of Alola Passion after an ally syncs reduces the sync countdown by one and supplies teamwide Physical Moves ↑ Next and Alola Circle. In the 4/5 method-B candidate, MP goes from zero back to one at 85.50 seconds, allowing another activation after Gladion’s sync at 128.25 seconds.
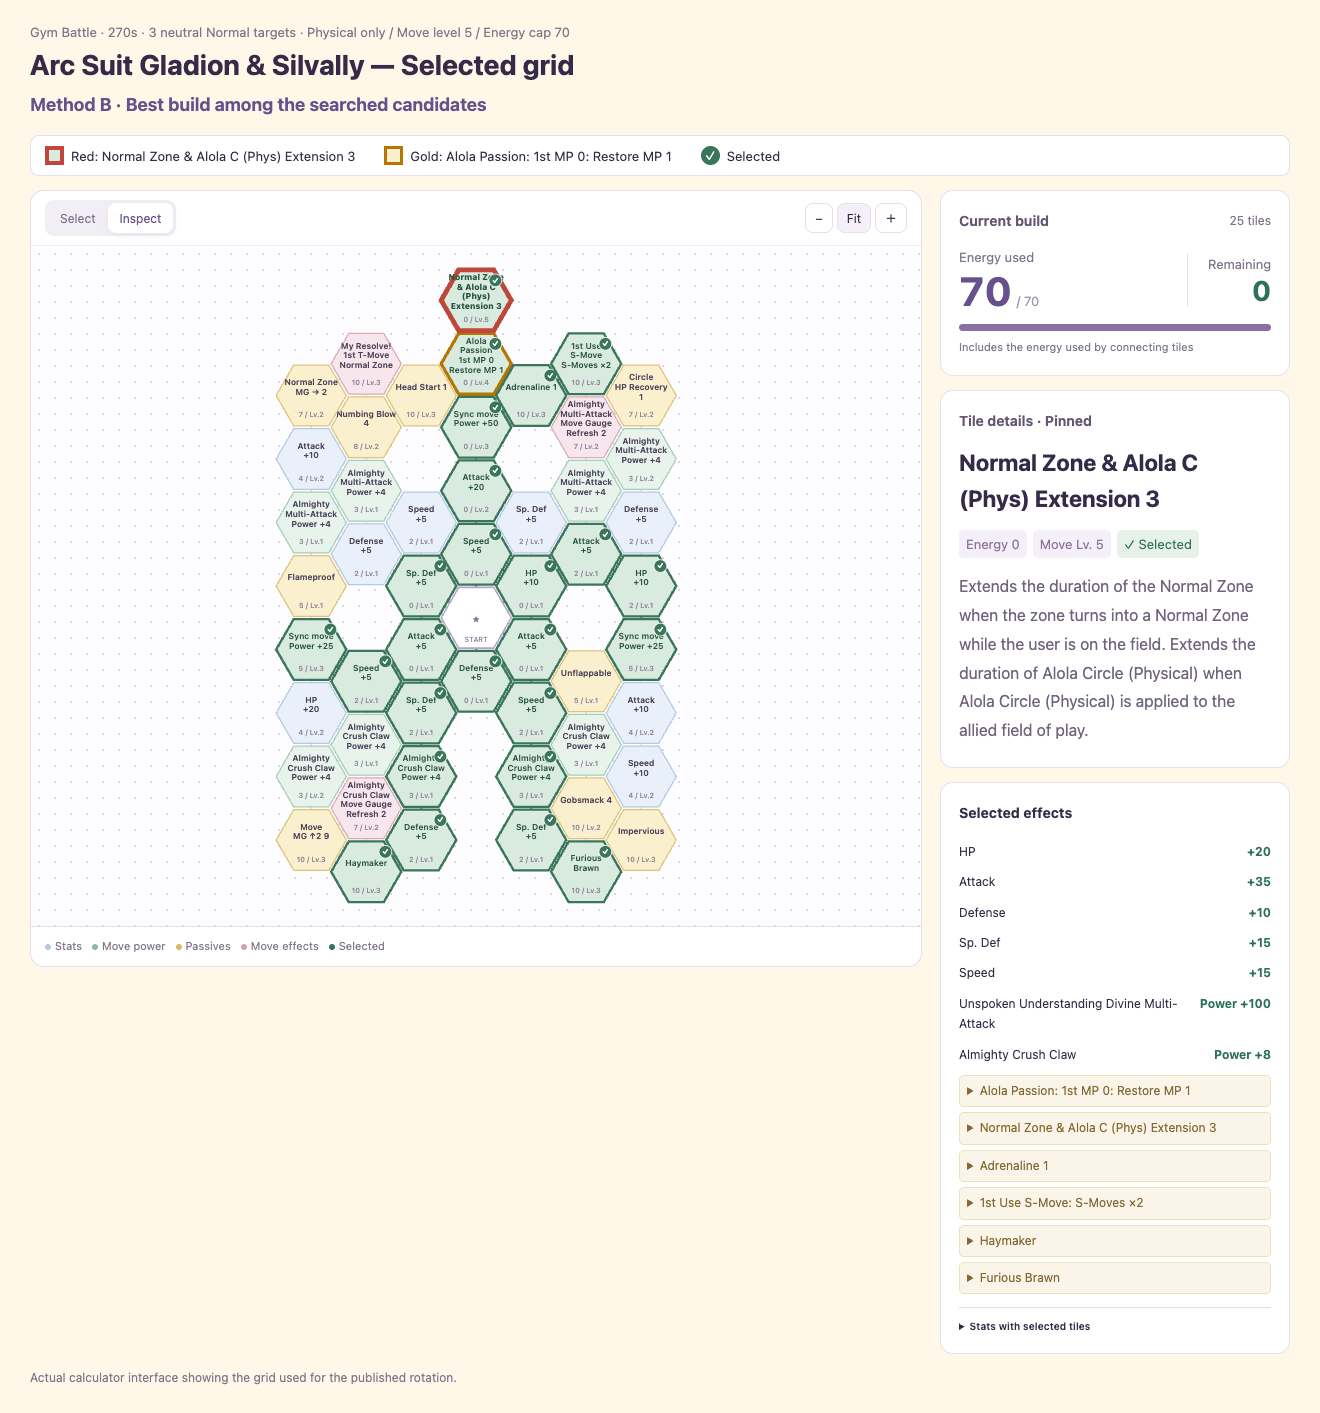
At 5/5, the new zero-energy tile is “Normal Zone & Alola C (Phys) Extension 3”. In the existing model, one application of Alola Circle lasts 80 seconds instead of 50. With the allies’ extensions included, Normal Zone lasts 140 seconds instead of 110. In the selected 5/5 rotation, the Circle refreshed at 161.50 seconds lasts until 241.50 seconds, covering Gladion’s second personal sync at 237.50 seconds.
In method B, 4/5→5/5 raises personal sync damage from 0.987 to 1.169 billion and regular/buddy damage from 2.275 to 2.810 billion. With two personal and four team syncs in both cases, total damage increases by+0.717 billion (+21.99%). The 5/5 grid also raises the combined sync-power bonus to +100, and the rotations differ.
Removing only the duration-extension tile from the selected 5/5 grid and replaying the same rotation gives3.038 billion. Holding the other 5/5 conditions fixed, the tile makes a difference of0.941 billion. This comparison uses different conditions from 4/5→5/5, so the two gains cannot be added together.
Damage breakdown and gain per candy
Each gain is relative to the previous move level under the same comparison method. Team and personal gains are identical.
| Method | Move Lv. | Gladion’s sync move index | Gladion’s regular and S-move index | Gain per candy (team = personal) |
|---|---|---|---|---|
| A | Lv. 1 | 0.251 billion | 1.657 billion | — |
| A | Lv. 2 | 0.279 billion | 1.869 billion | +0.241 billion |
| A | Lv. 3 | 0.588 billion | 2.051 billion | +0.49 billion |
| A | Lv. 4 | 0.609 billion | 2.30 billion | +0.271 billion |
| A | Lv. 5 | 1.169 billion | 2.81 billion | +1.069 billion |
| B | Lv. 1 | 0.346 billion | 1.76 billion | — |
| B | Lv. 2 | 0.385 billion | 1.981 billion | +0.26 billion |
| B | Lv. 3 | 0.952 billion | 1.999 billion | +0.586 billion |
| B | Lv. 4 | 0.987 billion | 2.275 billion | +0.31 billion |
| B | Lv. 5 | 1.169 billion | 2.81 billion | +0.717 billion |
Main grid tiles at each move level
Methods A and B selected the same grid at each move level in this comparison.
| Move Lv. | Main selected tiles |
|---|---|
| Lv. 1 | Attack+15/Almighty Multi-Attack power+12/Almighty Crush Claw power+16 |
| Lv. 2 | Attack+55/Almighty Multi-Attack power+16/Almighty Crush Claw power+20 |
| Lv. 3 | Attack+35/Almighty Multi-Attack power+4/Almighty Crush Claw power+8/Sync power+75/Adrenaline 1/1st Use S-Move: S-Moves ×2/Haymaker/Furious Brawn |
| Lv. 4 | Attack+35/Almighty Multi-Attack power+4/Almighty Crush Claw power+8/Sync power+75/Adrenaline 1/1st Use S-Move: S-Moves ×2/Haymaker/Furious Brawn/Alola Passion: 1st MP 0: Restore MP 1 |
| Lv. 5 | Attack+35/Almighty Crush Claw power+8/Sync power+100/Adrenaline 1/1st Use S-Move: S-Moves ×2/Haymaker/Furious Brawn/Alola Passion: 1st MP 0: Restore MP 1/Normal Zone & Alola C (Phys) Extension 3 |
Hau gains more when raised to the same move level
Read Hau’s move-level 1–5 comparison
For limited search B with adjusted rotations, we compare each pair against its own 1/5 baseline, separating team and personal damage. Hau faces Electric-weak opponents, while Gladion deals neutral Normal damage. These are investment gains within each team, under different enemy conditions. We do not add the indices together or use them as a ranking against the same opponent.
| Move Lv. | Hau team vs 1/5 | Gladion team vs 1/5 | Hau personal vs 1/5 | Gladion personal vs 1/5 |
|---|---|---|---|---|
| Lv. 1 | +0.00% | +0.00% | +0.00% | +0.00% |
| Lv. 2 | +25.72% | +12.35% | +30.11% | +12.35% |
| Lv. 3 | +79.65% | +40.16% | +90.88% | +40.16% |
| Lv. 4 | +91.68% | +54.90% | +105.03% | +54.90% |
| Lv. 5 | +137.07% | +88.96% | +159.09% | +88.96% |
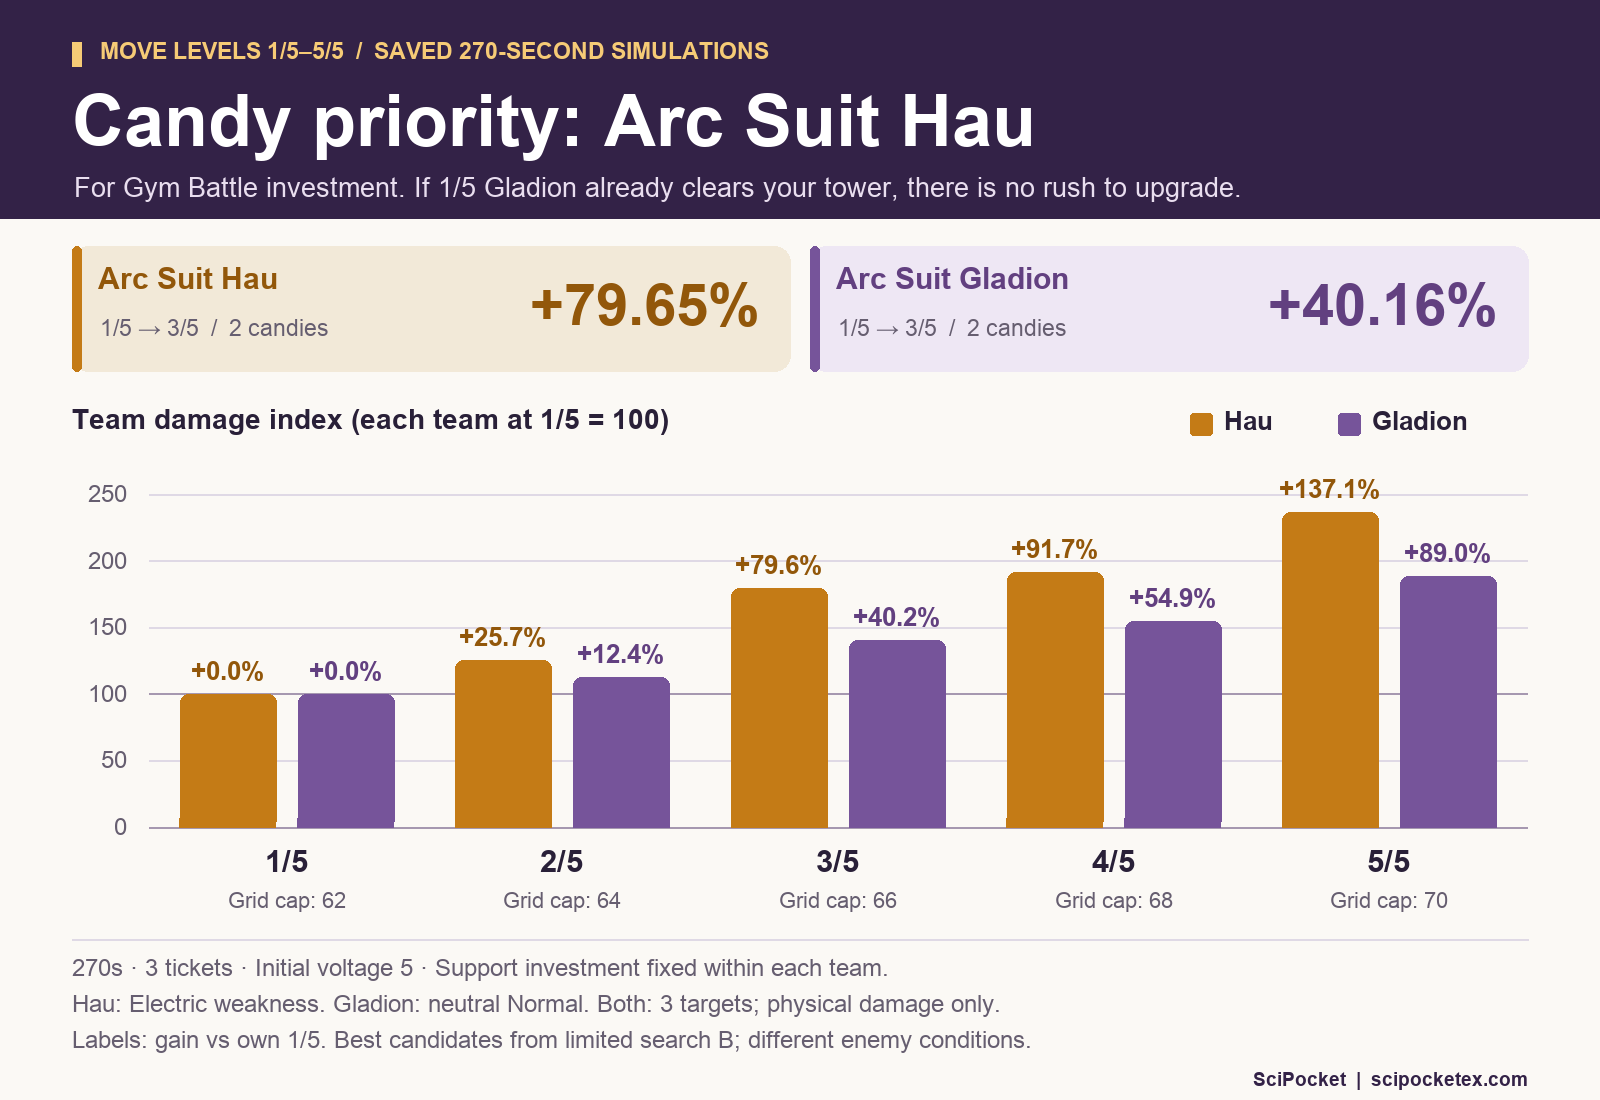
From 1/5 to 3/5, Hau gains+79.65%in team damage and+90.88%personally. Gladion gains+40.16%in both. From 1/5 to 5/5, Hau’s team gains+137.07%, compared with Gladion’s+88.96%. Among the candidates tested, Hau gains more from 1/5 at every shared target level from 2/5 through 5/5.
This does not mean Hau wins every individual upgrade step.From 3/5 to 4/5, team damage rises by 6.70% for Hau and 10.52% for Gladion, so Gladion gains more over that interval. If you have already invested, consider the gain from your current move level as well.
The fixed-rotation comparison A also gives Hau larger team gains: +64.14% versus Gladion’s +38.36% at 1/5→3/5, and +145.97% versus +108.64% at 1/5→5/5. Each method uses its own 1/5 result as the baseline.
How should you split two candies between Hau and Gladion?
Both start at 1/5. These gains use each team’s own baseline in limited search B, retaining Electric weakness for Hau and neutral Normal damage for Gladion.
| Investment | Hau gain (team/personal) | Gladion gain (team/personal) |
|---|---|---|
| Hau to 3/5 | +79.65%/+90.88% | +0.00%/+0.00% |
| Gladion to 3/5 | +0.00%/+0.00% | +40.16%/+40.16% |
| Both to 2/5 | +25.72%/+30.11% | +12.35%/+12.35% |
If both are at 1/5 and you have two candies to improve Gym Battle damage, we would prioritize taking Hau to 3/5. His growth from 1/5 is larger, and he has a clear role in Electric-weak Gym Battles. Taking both to 2/5 improves both teams, but for this purpose we would aim for Hau’s 3/5 first.
What our earlier Gym Battle articles suggest about Normal damage
Gladion’soriginal Normal physical damage articlestates the following condition:
This comparison uses neutral Normal damage.
Our eight-type comparison for the fifth Gym Battlecovers the EX4-and-later rules: Normal attacks are valid, but only super-effective attacks receive the extra 50% damage bonus. Neutral Normal damage receives neither the usual weakness multiplier nor that extra bonus. If you can field suitable weakness attackers, increasing Normal damage alone offers less reason to choose it as your Gym Battle centerpiece.
The original Juliana team’s3.979 billionexceeded the then-published Electric physical result of2.826 billion. However, that comparison used N’s team before Hau arrived. Thesubsequent Hau articlereported12.696 billionin its November 2 update for Electric-weak opponents immune to special attacks. Beating the old 2.826-billion result is therefore insufficient by itself to establish today’s investment priority.
In the eight-type article, the other seven special-immune matchups had published indices of4.334–10.081 billion, all above Gladion’s 3.979 billion. These articles differ in enemy conditions, calculation models, and rotations, so those ratios are not direct measures of in-game superiority. Even so,the published results and Gym rules give little reason to prioritize extra Normal damage from Gladion’s move levels when you already have suitable weakness teams. Its use case differs from investing in an attacker such as Hau for a weakness matchup.
Prioritize Hau; do not rush Gladion if 1/5 already meets your needs
A clear of the Normal Tower’s top floor at 1/5 has been reported. If you already achieve that at 1/5, spending more candies for the clear is a low priority.
Gladion gains substantial sync damage at 3/5 and longer Zone and Circle duration at 5/5. But if 1/5 already clears your Normal Tower and you can field weakness teams in Gym Battles, there is little urgency to invest for extra damage.When choosing between the two, we prioritize Hau based on these investment gains and Gym Battle use, which is this article’s recommendation.
Consider additional candies for Gladion when you have a specific use for the upgraded build, such as continuing to use him as your main attacker.
Note: The 1/5 Tower clear is based on a player report supplied while preparing this article. The damage tables are calculations under the stated Gym Battle conditions.
Open the selected teams in the calculator
The links below restore all three pairs, their grids, move levels, and rotations. You can also use them to try your own investment while retaining the support conditions.
- Reproduce limited-search B at 1/5
- Reproduce limited-search B at 3/5
- Reproduce limited-search B at 5/5
Simulation scope
The existing model does not evaluate Multi EX’s first-sync Type Rebuff reduction or Almighty Crush Claw’s doubled power when only some opponents have Physical Move Break. Juliana’s Normal Type Rebuff reduction applies to one target. We retain the published assumption that moves whose damage is excluded still trigger their successful-use support effects.
Timing approximates three allied actions and one enemy action as 19 seconds. Animations, gauge waiting, incoming damage and survival, remaining enemy HP, and round transitions are not simulated. Limited-search values are the best among the candidates compared.